Hey there, tech enthusiasts! If you're reading this, chances are you're looking for ways to revolutionize your IoT setup without breaking the bank. Welcome to the ultimate guide on free remote IoT monitoring with Raspberry Pi! In this article, we'll dive deep into everything you need to know to get started. Whether you're a seasoned pro or just dipping your toes into the world of IoT, this guide has got you covered.
Imagine having the power to monitor your devices remotely, streamline your data collection, and keep everything running smoothly—all without spending a fortune. That's exactly what Raspberry Pi brings to the table. This tiny yet powerful device is the ultimate tool for anyone looking to create a robust IoT system.
So, buckle up because we’re about to take you on a journey through the ins and outs of setting up remote IoT monitoring with Raspberry Pi. By the end of this guide, you’ll be ready to build your own system and enjoy all the benefits that come with it. Let’s get started!
Read also:Denver Broncos News Cam Newtons Potential Impact On The Team
Table of Contents
Why Free RemoteIoT Monitoring Matters
Best Software Options for Free Monitoring
Read also:Where Is Suge Knight Now Discover The Controversial Icons Current Status
Security Tips for Your IoT System
Common Issues and How to Fix Them
Cost Benefits of Using Raspberry Pi
Future Trends in IoT Monitoring
What is Raspberry Pi?
Raspberry Pi is like the Swiss Army knife of the tech world. This credit card-sized computer packs a punch with its versatility and affordability. It's not just a gadget; it's a platform that empowers creators, hobbyists, and professionals alike to build amazing projects, including remote IoT monitoring systems.
Let’s break it down a bit. The Raspberry Pi is a single-board computer that runs on Linux-based operating systems. It has multiple GPIO (General Purpose Input/Output) pins, which allow you to connect sensors, actuators, and other peripherals. Plus, it supports Wi-Fi and Bluetooth, making it perfect for wireless communication.
And here’s the kicker—it’s super affordable! You can get a Raspberry Pi for as little as $35, which is a steal considering the capabilities it offers. So, whether you’re setting up a smart home system or monitoring industrial equipment, Raspberry Pi has got your back.
Why Choose Raspberry Pi for IoT?
- Affordable price tag
- Highly customizable
- Strong community support
- Compatible with various sensors and devices
- Easy to set up and use
With all these advantages, it’s no wonder Raspberry Pi has become a go-to choice for IoT enthusiasts around the globe. Now that we’ve got the basics covered, let’s dive into the world of IoT.
Understanding IoT Basics
Before we jump into the nitty-gritty of remote IoT monitoring, let’s take a moment to understand what IoT really is. IoT, or the Internet of Things, refers to the network of physical devices embedded with sensors, software, and connectivity, enabling them to exchange data with other devices and systems over the internet.
In simpler terms, IoT allows everyday objects to become "smart" by connecting them to the internet. Think of smart thermostats, wearable fitness trackers, or even smart refrigerators that tell you when you're running low on milk. The possibilities are endless.
Now, why does remote IoT monitoring matter? Well, imagine being able to check the status of your devices, receive alerts, and make adjustments from anywhere in the world. That’s the power of remote monitoring. It gives you control and peace of mind, knowing that your system is always up and running.
Key Components of IoT
- Sensors: Collect data from the environment
- Connectivity: Transfers data to the cloud or other devices
- Data Processing: Analyzes and interprets the collected data
- User Interface: Provides a way to interact with the system
By combining these components, you can create a comprehensive IoT system that meets your specific needs. And with Raspberry Pi as your foundation, the sky's the limit.
Why Free RemoteIoT Monitoring Matters
Okay, so you might be wondering why you should bother with free remote IoT monitoring when there are plenty of paid solutions out there. Here’s the deal: free doesn’t mean low-quality. In fact, with the right tools and setup, you can achieve professional-grade monitoring without spending a dime.
Free remote IoT monitoring offers several advantages:
- Cost-Effective: No subscription fees or hidden costs
- Customizable: Tailor the system to your exact needs
- Learning Opportunity: Gain hands-on experience with IoT technologies
- Community Support: Tap into a vast network of enthusiasts and experts
Plus, let’s face it—there’s something incredibly satisfying about building your own system from scratch. It’s like putting together a puzzle where every piece fits perfectly. And with Raspberry Pi, you have all the tools you need to make it happen.
How Does Remote Monitoring Work?
At its core, remote monitoring involves collecting data from sensors, transmitting it to a central hub (in this case, your Raspberry Pi), and then making it accessible via a web interface or mobile app. This allows you to monitor your devices in real-time, no matter where you are.
For example, if you’re running a smart greenhouse, you can use sensors to monitor temperature, humidity, and soil moisture levels. These readings are sent to your Raspberry Pi, which processes the data and displays it on a dashboard. If something goes wrong, you’ll receive an instant alert, allowing you to take action before it becomes a bigger problem.
Step-by-Step Setup Guide
Alright, let’s get our hands dirty and set up your free remote IoT monitoring system with Raspberry Pi. Don’t worry; we’ll walk you through each step to ensure a smooth and successful setup.
What You’ll Need
- Raspberry Pi (Model 3 or higher)
- MicroSD card (16GB or higher)
- Power supply
- Sensors (e.g., temperature, humidity, motion)
- Wi-Fi network
- Computer with an internet connection
Step 1: Install Raspberry Pi OS
Start by downloading the Raspberry Pi Imager from the official website. Use it to flash the Raspberry Pi OS onto your microSD card. Once that’s done, insert the card into your Raspberry Pi and power it on.
Step 2: Connect to Wi-Fi
During the initial setup, you’ll be prompted to connect to your Wi-Fi network. Enter your network credentials, and your Raspberry Pi will be online in no time.
Step 3: Install Required Software
Open a terminal window and run the following commands to install necessary packages:
sudo apt update && sudo apt upgrade
sudo apt install python3-pip python3-venv
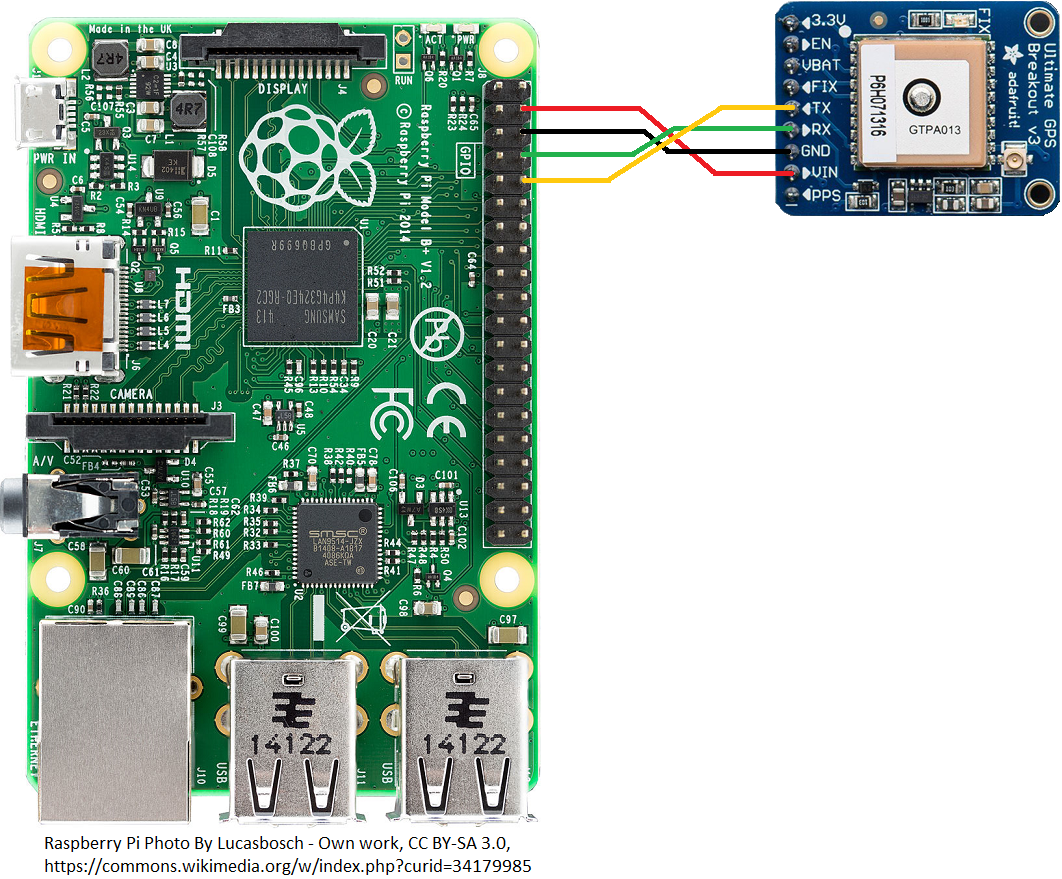
Step 4: Set Up Your Sensors
Connect your sensors to the GPIO pins on your Raspberry Pi. Refer to the sensor’s documentation for wiring instructions. Once connected, test the sensors to ensure they’re working properly.
Step 5: Create a Web Interface
Use a framework like Flask or Django to create a web interface for your monitoring system. This will allow you to view sensor data and control your devices from any device with a web browser.
Best Software Options for Free Monitoring
When it comes to software for free remote IoT monitoring, you’ve got plenty of options to choose from. Here are a few of the best:
1. Node-RED
Node-RED is a powerful flow-based programming tool that makes it easy to connect devices, APIs, and services. It’s perfect for creating complex workflows without writing a single line of code.
2. Home Assistant
Home Assistant is an open-source home automation platform that lets you monitor and control all your smart devices from one place. It’s highly customizable and integrates seamlessly with Raspberry Pi.
3. Grafana
Grafana is a data visualization platform that allows you to create beautiful dashboards to display your sensor data. It supports a wide range of data sources, making it a great choice for IoT monitoring.
Security Tips for Your IoT System
As with any connected system, security should be a top priority. Here are a few tips to keep your remote IoT monitoring system safe:
- Use strong passwords and enable two-factor authentication
- Keep your software and firmware up to date
- Limit access to your system to trusted devices and users
- Encrypt your data transmissions
By following these best practices, you can protect your system from potential threats and ensure its smooth operation.
Common Issues and How to Fix Them
Even the best-laid plans can hit a snag. Here are some common issues you might encounter when setting up your Raspberry Pi-based IoT monitoring system and how to fix them:
Problem: Sensors Not Responding
Solution: Check your wiring and ensure that the sensors are properly connected to the GPIO pins. Refer to the sensor’s documentation for troubleshooting tips.
Problem: Web Interface Not Loading
Solution: Verify that your Raspberry Pi is connected to the internet and that the web server is running. Check your firewall settings to ensure that incoming connections are allowed.
Problem: Data Not Updating
Solution: Make sure that your sensors are sending data at regular intervals. Adjust the polling frequency in your software to ensure timely updates.
Cost Benefits of Using Raspberry Pi
One of the biggest advantages of using Raspberry Pi for remote IoT monitoring is the cost savings. Not only is the device itself affordable, but you also avoid the recurring costs associated with paid solutions.
Here’s a quick breakdown of potential cost savings:
- Raspberry Pi: $35
- Sensors: $10-$50 per sensor
- Power supply and accessories: $20-$30
Compare that to the hundreds or even thousands of dollars you might spend on a commercial IoT monitoring system, and it’s easy to see why Raspberry Pi is such a great option.
Future Trends in IoT Monitoring
The world of IoT is evolving rapidly, and the future looks bright for remote monitoring systems. Here are a few trends to watch out for:
- Edge Computing: Processing data closer to the source for faster insights
- AI Integration: Using machine learning to predict and prevent issues
- 5G Connectivity: Enabling faster and more reliable communication
By staying ahead of these trends, you can ensure that your IoT system remains cutting-edge and effective.
Conclusion
And there you have it—the ultimate guide to free remote IoT monitoring with Raspberry Pi. From understanding the basics to setting up your system and exploring future trends, we’ve covered everything you need to know to get started.
Remember, the key to success lies in planning, testing, and iterating. Don’t be afraid to experiment and try new things. The more you learn, the better equipped you’ll be to create a robust and reliable IoT system.
So, what are you waiting for? Grab your Raspberry Pi, gather your sensors, and start building your dream IoT monitoring system. And don’t forget to share your progress with the community—you never know who you might inspire!
Thanks for reading, and happy tinkering!